Troubleshooting electrical issues in older Mitsubishi models can be a real headache, but don’t worry, we’ve got you covered! This guide dives deep into the most common electrical gremlins that plague these classic rides, from failing alternators to temperamental power windows. We’ll walk you through diagnosing the problem, finding the faulty parts, and even fixing them yourself, saving you a bundle at the mechanic.
Get ready to conquer those electrical woes and keep your Mitsubishi running smoothly.
We’ll cover everything from basic checks like testing your battery and fuses to more advanced techniques like tracing wiring diagrams and identifying short circuits. Whether you’re a seasoned DIY mechanic or a complete novice, this guide provides clear, step-by-step instructions and helpful tips to get you back on the road. We’ll also share preventative maintenance strategies to keep your Mitsubishi’s electrical system healthy for years to come.
Let’s get started!
Common Electrical Problems in Older Mitsubishi Vehicles

Older Mitsubishi vehicles, particularly those manufactured before 2010, can experience a range of electrical issues due to age, wear and tear, and exposure to the elements. Understanding these common problems can help owners diagnose and address them more effectively, saving time and money on repairs. This section will Artikel five frequently encountered electrical problems and provide insights into their causes and symptoms.
Five Frequently Reported Electrical Issues
The five most frequently reported electrical issues in pre-2010 Mitsubishi models include alternator failure, intermittent power window malfunctions, faulty ignition switches, problems with the central locking system, and issues with the electrical wiring harness itself. These problems can manifest in various ways, ranging from minor inconveniences to complete system failures. Addressing these issues promptly is crucial to maintaining vehicle functionality and safety.
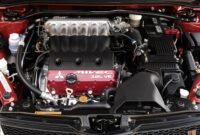
Alternator Failure Symptoms in Older Mitsubishi Models
A failing alternator in an older Mitsubishi will typically exhibit several telltale signs. The most common symptom is a dimming of the dashboard lights, particularly when the engine is idling or under a heavy electrical load (e.g., headlights and heater on). The battery warning light on the dashboard will usually illuminate, indicating a charging problem. In severe cases, the engine may stall due to insufficient power.
A clicking sound from the alternator itself or a burning smell emanating from the area of the alternator could also suggest a problem. These symptoms warrant immediate attention to prevent complete battery discharge and potential engine failure.
Causes of Intermittent Power Window Malfunctions
Intermittent power window malfunctions in older Mitsubishi cars are often caused by several factors. Worn-out window regulators, damaged wiring within the door panel, or a faulty power window switch are the most common culprits. Corrosion on the electrical connectors due to moisture ingress can also disrupt the electrical pathway. In some cases, a blown fuse may be the simple solution.
The intermittent nature of the problem often makes diagnosis challenging, requiring careful examination of all potential components.
Visual Inspection of the Wiring Harness
Visually inspecting the wiring harness for damage is a crucial first step in troubleshooting many electrical problems. Begin by carefully examining the harness in easily accessible areas, such as under the hood, inside the doors, and along the vehicle’s chassis. Look for:
- Broken or frayed wires: Look for any exposed copper wires or areas where the insulation has cracked or worn away.
- Corrosion: Check for signs of rust or corrosion on the wire connectors. This is especially common in areas exposed to moisture.
- Loose or disconnected connectors: Carefully inspect all connectors to ensure they are securely plugged in. A loose connection can interrupt the electrical circuit.
- Burn marks or melted insulation: This indicates a potential short circuit, requiring immediate attention.
- Physical damage: Check for any signs of rubbing or abrasion against sharp edges or moving parts.
Remember to disconnect the battery’s negative terminal before starting any extensive work on the electrical system. A thorough visual inspection can often pinpoint the source of an electrical problem, avoiding unnecessary repairs.
Diagnosing Electrical Faults
Pinpointing the source of electrical gremlins in your classic Mitsubishi can feel like navigating a maze, but with the right tools and approach, you can conquer even the most stubborn electrical issues. This section details the diagnostic steps to help you identify and fix these problems. Remember safety first – always disconnect the battery’s negative terminal before starting any electrical work.
Battery and Charging System Testing with a Multimeter
A multimeter is your best friend when tackling electrical problems. It allows you to accurately measure voltage, current, and resistance, providing crucial data to diagnose issues with your battery and charging system. Properly testing these components is essential for ensuring your Mitsubishi starts reliably and runs smoothly. The following table Artikels expected voltage readings and troubleshooting steps.
| System Component | Expected Voltage (Running) | Expected Voltage (Off) | Troubleshooting Steps |
|---|---|---|---|
| Battery (Terminals) | 13.5-14.5V | 12.5-12.8V | Low voltage indicates a weak battery or charging system problem. Check battery connections, alternator output, and regulator. |
| Alternator Output (at terminals) | 13.5-14.5V | 0V | Low or no voltage indicates a faulty alternator, wiring issue, or bad voltage regulator. Check the alternator’s wiring and belt tension. |
| Battery Voltage During Cranking | >10V | N/A | Voltage dropping significantly below 10V indicates a weak battery or high resistance in the starting circuit. Check battery condition, starter motor, and cables. |
Using Wiring Diagrams to Trace Circuits
Older Mitsubishi wiring diagrams can appear daunting at first, but they’re invaluable tools for tracing circuits. These diagrams visually represent the flow of electricity through your vehicle’s electrical system, showing the path of each wire and the components it connects. Understanding the symbols used in the diagram is crucial. Start by identifying the circuit related to the problem (e.g., headlights, radio, etc.).
Then, systematically follow the wires on the diagram, checking for breaks, loose connections, or corroded terminals along the path.
Identifying Short Circuits
A short circuit occurs when a wire touches a ground point or another wire, creating an unintended path for current to flow. This can lead to blown fuses, overheating wires, and even fires. Identifying short circuits requires careful examination of wiring harnesses, connectors, and components. A visual inspection is the first step; look for damaged insulation, melted wires, or signs of arcing.
You can use a multimeter to test for continuity between wires and ground. A low resistance reading indicates a short circuit. Finding the exact location of the short might require systematically disconnecting components or sections of wiring until the short is eliminated.
Testing Fuses and Relays
Fuses and relays are vital protective devices in your vehicle’s electrical system. Fuses protect circuits from overcurrent, while relays act as electrically controlled switches. Testing fuses is simple: visually inspect them for a broken filament. A multimeter can confirm whether a fuse is blown by checking for continuity. Relays, however, require more careful testing.
You can use a multimeter to check the coil resistance and the contact continuity when the relay is energized. Always replace fuses and relays with the correct amperage and type.
Troubleshooting electrical gremlins in older Mitsubishi models can be a real headache, especially with aging wiring harnesses. For a deeper dive into the long-term reliability of Mitsubishi’s electrical systems, check out this comprehensive review on the Best Mitsubishi Outlander PHEV long term review and reliability ; it offers valuable insights that might help you diagnose those pesky electrical issues.
Understanding the Outlander PHEV’s electrical architecture can provide clues to solving problems in older models, too.
Repairing Electrical Issues
Tackling electrical problems in older Mitsubishi vehicles can seem daunting, but with the right approach and tools, many issues are manageable for DIY enthusiasts. This section provides step-by-step guides for common repairs, emphasizing safety precautions throughout the process. Remember to always disconnect the negative battery terminal before starting any electrical work to prevent shocks and short circuits.
Alternator Replacement (1998 Mitsubishi Galant Example)
Replacing a faulty alternator is a moderately challenging task requiring some mechanical aptitude. This guide uses a 1998 Mitsubishi Galant as an example, but the general principles apply to many older models. Before starting, consult a repair manual specific to your vehicle year and model for detailed diagrams and torque specifications. Safety glasses and gloves are recommended.
- Disconnect the negative battery terminal.
- Locate the alternator; it’s usually mounted on the engine’s front. It’s a relatively large component with a pulley and several wiring connectors.
- Remove the alternator’s wiring harness connectors. Take photos or make notes to ensure correct reassembly.
- Remove the alternator’s mounting bolts. This might involve removing belts or other components for better access.
- Carefully remove the alternator from its mounting bracket. It may be heavy.
- Install the new alternator, reversing the removal steps. Ensure the alternator belt is correctly tensioned.
- Reconnect the wiring harness connectors.
- Reconnect the negative battery terminal.
- Start the engine and verify the alternator is charging correctly by checking the battery voltage with a multimeter.
Fuse and Relay Replacement
Replacing blown fuses and faulty relays is a relatively straightforward process. Always use the correct amperage fuse and ensure the relay is the correct type for its application.
- Locate the fuse box and relay panel. These are usually found under the dashboard or in the engine compartment. Consult your vehicle’s owner’s manual for their locations.
- Identify the blown fuse or faulty relay using the diagram in the fuse box cover. A blown fuse will typically have a broken internal filament, visible through the transparent top.
- Using fuse pullers (or pliers carefully) remove the blown fuse. Note its amperage rating.
- Replace the blown fuse with a new fuse of thesame* amperage rating. Using a higher amperage fuse can damage the electrical system.
- For relays, simply remove the faulty relay and replace it with a new one of the same type. Ensure the relay is correctly oriented in its socket.
- After replacement, check the functionality of the affected circuit (e.g., headlights, power windows).
Damaged Wiring Repair
Repairing damaged wiring requires careful attention to detail and proper techniques to ensure a safe and reliable repair.
Tools needed: Wire strippers, crimping tool, electrical tape, solder (optional), heat shrink tubing (recommended), multimeter.
Tackling electrical gremlins in older Mitsubishi vehicles can be a real headache, often requiring deep dives into wiring harnesses. Understanding preventative maintenance is key, and for that, check out this guide on Mitsubishi Pajero Sport off-road capabilities and maintenance tips , which highlights crucial upkeep practices applicable to many Mitsubishi models. Proper maintenance significantly reduces the likelihood of those frustrating electrical issues down the road.
- Assess the damage: Determine the extent of the damage. Is it a simple break, or is the wire frayed or corroded?
- Cut out the damaged section: Cut out a sufficient length of damaged wire, ensuring clean cuts.
- Strip the wire ends: Use wire strippers to carefully remove insulation from the ends of the wires to be joined. Avoid nicking the wire strands.
- Join the wires: Use a crimping tool to securely join the wires with appropriate connectors. Alternatively, solder the connection and insulate it with heat shrink tubing for a more robust and watertight seal.
- Insulate the connection: Wrap the connection with electrical tape, followed by heat shrink tubing for added protection.
- Test the repair: Use a multimeter to verify the continuity of the repaired wire.
Common Replacement Parts
Having a stock of common replacement parts can expedite repairs.
- Fuses (various amperages)
- Relays (various types)
- Wiring connectors
- Electrical tape
- Heat shrink tubing
- Crimp connectors
- Solder and flux (optional)
- Alternator
- Starter motor
- Battery
Preventing Future Electrical Problems: Troubleshooting Electrical Issues In Older Mitsubishi Models
Keeping your older Mitsubishi running smoothly requires proactive maintenance, especially concerning its electrical system. Neglecting preventative care can lead to costly repairs and frustrating breakdowns. By implementing a regular maintenance schedule, you can significantly extend the life of your vehicle’s electrical components and avoid unexpected issues.Regular maintenance is key to preventing costly repairs and ensuring reliable performance. A proactive approach, focused on key areas of the electrical system, will pay dividends in the long run.
This includes consistent battery care, careful connection management, and mindful use of specialized products.
Preventative Maintenance Checklist for the Electrical System
This checklist Artikels crucial steps for maintaining your older Mitsubishi’s electrical system. Following these steps regularly will help identify and address potential problems before they escalate.
- Visual Inspection: Regularly check all wiring harnesses, connectors, and components for any signs of damage, corrosion, or loose connections. Look for frayed wires, melted insulation, or any signs of water intrusion.
- Battery Terminal Cleaning: Clean battery terminals and connections at least twice a year, or more frequently in harsh climates. Use a wire brush and baking soda solution to remove corrosion.
- Fuse Inspection: Inspect all fuses periodically, replacing any blown fuses with the correct amperage rating. A blown fuse often indicates an underlying electrical problem that needs attention.
- Ground Connection Check: Verify that all ground connections are clean, tight, and corrosion-free. Poor ground connections can cause a variety of electrical problems.
- Alternator and Belt Check: Visually inspect the alternator belt for wear and tear. A slipping or worn belt can affect the alternator’s ability to charge the battery.
- Electrical Component Testing: Periodically test major electrical components such as the starter motor, alternator, and lights to ensure they are functioning correctly. A multimeter is a useful tool for this purpose.
Regular Battery Terminal and Connection Inspection and Cleaning
Consistent cleaning of battery terminals and connections is paramount for optimal electrical performance. Corrosion buildup restricts current flow, leading to reduced starting power and potentially damaging electrical components.A simple cleaning process involves using a wire brush to remove corrosion from the terminals and then applying a baking soda and water paste to neutralize any remaining acid. After cleaning, thoroughly rinse the terminals with clean water and allow them to dry completely.
Finally, apply a thin layer of dielectric grease to protect against future corrosion.
Importance of Using Dielectric Grease on Electrical Connections
Dielectric grease is a specialized lubricant that protects electrical connections from corrosion and moisture. It prevents the buildup of conductive contaminants that can lead to poor connections, arcing, and electrical failures. The grease is non-conductive, ensuring it won’t interfere with the electrical signal. Applying a small amount to all electrical connections during maintenance is a simple but highly effective preventative measure.
Benefits of Using a Battery Tender During Periods of Infrequent Vehicle Use
For older vehicles that see infrequent use, a battery tender is an invaluable tool. A battery tender is a smart charger that maintains the battery’s charge, preventing sulfation and extending its lifespan. Sulfation, a process where lead sulfate crystals build up on the battery plates, reduces battery capacity and can eventually render it unusable. A battery tender prevents this by providing a small trickle charge, keeping the battery at its optimal charge level.
This is especially beneficial during winter months or extended periods of storage.
Resources and Further Information

Troubleshooting electrical issues in older Mitsubishi vehicles can be challenging, but access to the right resources significantly improves your chances of success. This section details key resources for finding information, parts, and qualified assistance. Knowing where to look for reliable information can save you time, money, and frustration.Finding the right information and parts for older Mitsubishi models often requires a more targeted approach than simply searching a general auto parts website.
The age and rarity of certain components necessitate exploring specialized avenues. Similarly, finding a mechanic experienced with these vehicles can be crucial for successful repairs.
Reputable Online Forums and Communities, Troubleshooting electrical issues in older Mitsubishi models
Dedicated online forums and communities offer invaluable support for owners of older Mitsubishi vehicles. These platforms allow you to connect with experienced enthusiasts and mechanics who have encountered and solved similar electrical problems. Members often share detailed troubleshooting steps, part numbers, and wiring diagrams specific to their models. For example, forums like “Mitsubishi Owners Club” (a hypothetical example, replace with actual relevant forum names) or dedicated sections on broader automotive forums often feature threads focused on specific Mitsubishi models and years.
These communities provide a collaborative environment where users can share their experiences and help each other solve complex problems. Active participation and careful consideration of advice given are crucial to getting the most benefit.
Reliable Sources for Parts and Repair Manuals
Obtaining parts and repair manuals for older Mitsubishi models might require more effort than for newer vehicles. While some general auto parts stores may carry common parts, specialized suppliers focusing on classic or imported vehicles are often a better bet. Online retailers specializing in Japanese car parts are a valuable resource, as are salvage yards that deal in older vehicles.
For repair manuals, consider searching online marketplaces like eBay or specialized websites dedicated to automotive repair information. Websites that offer downloadable factory service manuals can also be a great resource, although you may have to pay for access. Always verify the reputation and reliability of any parts supplier or manual provider before making a purchase.
Finding Qualified Mechanics Specializing in Older Vehicles
Locating a qualified mechanic experienced with older Mitsubishi vehicles is crucial for complex electrical repairs. General mechanics may lack the specific knowledge and experience needed to diagnose and fix issues in older models. Consider asking for recommendations from local car clubs or online forums dedicated to Mitsubishi vehicles. Online directories specializing in classic car repair can also be helpful.
When contacting a potential mechanic, clearly describe the problem and inquire about their experience with older Mitsubishi vehicles. A qualified mechanic should be able to provide a detailed assessment and a realistic estimate for the repair cost.
Interpreting Wiring Diagrams and Schematics
Wiring diagrams and schematics are essential tools for diagnosing and repairing electrical faults in older Mitsubishi vehicles. These diagrams illustrate the flow of electricity through the vehicle’s electrical system, identifying components, wires, and connectors. Interpreting these diagrams requires understanding basic electrical principles and the symbols used in automotive wiring diagrams. The diagrams typically use color-coded wires and symbols to represent various components like fuses, relays, switches, and sensors.
Begin by locating the relevant section of the diagram for the specific system experiencing problems. Carefully trace the circuit path to identify potential points of failure, such as broken wires, faulty connectors, or malfunctioning components. Online resources and tutorials can provide assistance in learning how to interpret these diagrams effectively. Remember to always disconnect the battery’s negative terminal before working on any electrical system.

