How to troubleshoot Mitsubishi Eclipse Cross engine problems? That’s a question many owners face. This guide dives deep into common engine issues plaguing the Eclipse Cross, from minor annoyances to major headaches. We’ll cover everything from basic visual inspections and OBD-II diagnostics to advanced techniques like compression tests and vacuum leak detection. Get ready to become your own Eclipse Cross engine whisperer!
We’ll explore frequent engine problems, their telltale symptoms, and the root causes. We’ll walk you through step-by-step diagnostic procedures, offering clear explanations and practical advice for tackling misfires, excessive oil consumption, overheating, and more. Whether you’re a seasoned mechanic or a DIY enthusiast, this guide equips you with the knowledge to diagnose and potentially resolve engine troubles, saving you time and money.
Understanding Common Mitsubishi Eclipse Cross Engine Problems
The Mitsubishi Eclipse Cross, while generally reliable, isn’t immune to engine issues. Understanding common problems and their symptoms can help owners address potential problems early, preventing more extensive and costly repairs down the line. This section will detail frequently reported engine problems, their associated symptoms, and potential causes. Early identification is key to maintaining your vehicle’s performance and longevity.
Engine Misfires
Engine misfires are a common complaint among Eclipse Cross owners. This occurs when one or more cylinders fail to ignite properly, leading to a noticeable disruption in the engine’s smooth operation. Symptoms include rough idling, a noticeable loss of power, a shaking or vibrating sensation, and a check engine light illuminating on the dashboard. Causes can range from faulty spark plugs or ignition coils to issues with fuel injectors or a problem within the engine’s computer system (ECU).
Severe misfires can lead to catalytic converter damage if left unaddressed.
Oil Consumption
Excessive oil consumption is another issue reported by some Eclipse Cross owners. This problem manifests as a gradual decrease in engine oil level, requiring more frequent top-ups. The low oil level warning light may illuminate on the dashboard. Causes can include worn piston rings, damaged valve seals, or a faulty PCV (positive crankcase ventilation) valve. Neglecting this issue can lead to serious engine damage due to insufficient lubrication.
Timing Chain Issues
While less common than misfires or oil consumption, problems with the timing chain can occur. The timing chain synchronizes the engine’s valves and pistons, and if it stretches or breaks, it can cause catastrophic engine damage. Symptoms can be subtle initially, perhaps a slight rattling noise from the engine, but can quickly escalate to complete engine failure. Causes include normal wear and tear over time, or less frequently, manufacturing defects.
Table of Common Mitsubishi Eclipse Cross Engine Problems
| Problem | Symptoms | Potential Causes | Severity |
|---|---|---|---|
| Engine Misfires | Rough idling, loss of power, shaking, check engine light | Faulty spark plugs, ignition coils, fuel injectors, ECU issues | Moderate to Severe (can lead to catalytic converter damage) |
| Excessive Oil Consumption | Low oil level, oil level warning light | Worn piston rings, damaged valve seals, faulty PCV valve | Moderate to Severe (can lead to engine seizure) |
| Timing Chain Issues | Rattling noise (initially), potential complete engine failure | Wear and tear, manufacturing defects | Severe (can cause catastrophic engine damage) |
Diagnostic Procedures for Engine Trouble
Troubleshooting engine problems in your Mitsubishi Eclipse Cross requires a systematic approach. This section details the diagnostic steps, from a basic visual inspection to using an OBD-II scanner, helping you pinpoint the source of the issue and guide your repair strategy. Remember, safety first! Always ensure the engine is cool and disconnected from the power source before performing any checks.
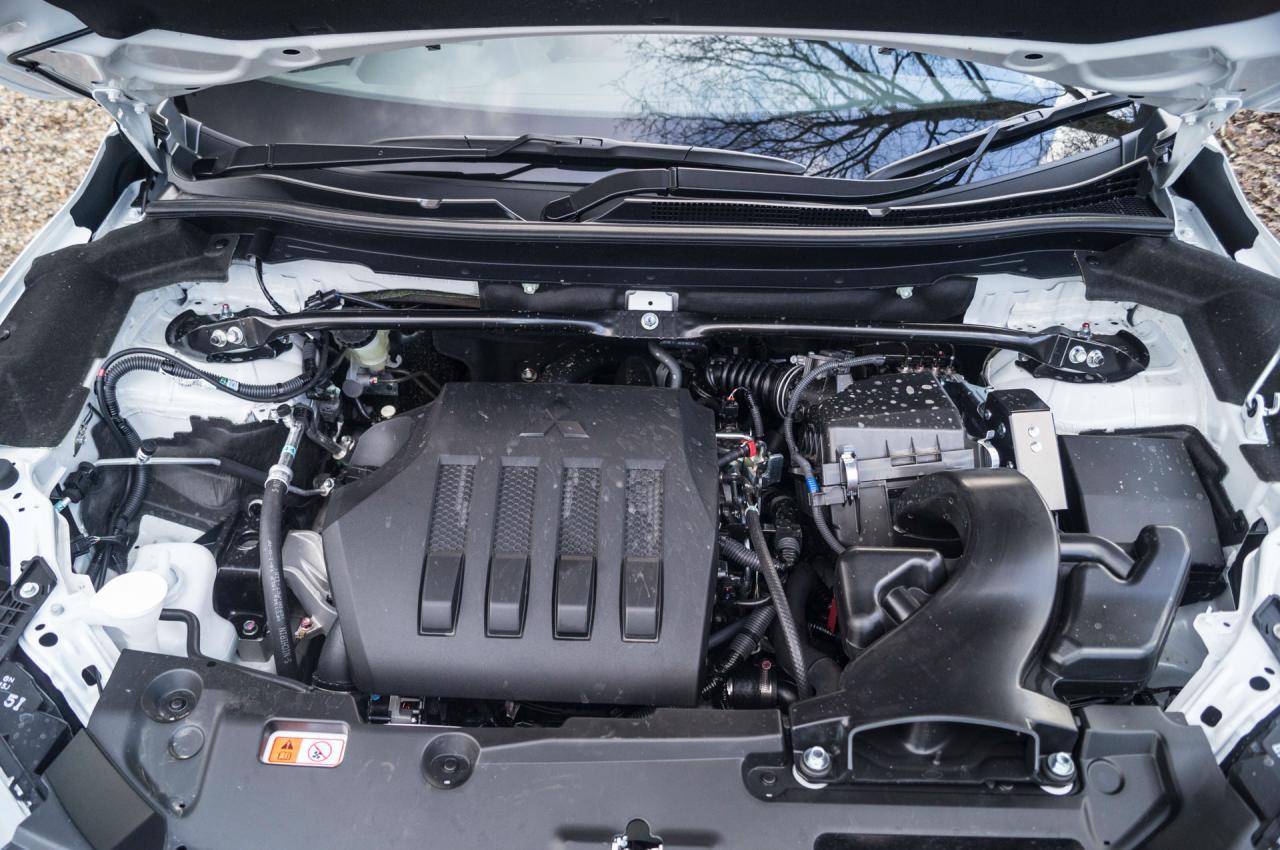
Visual Inspection of the Engine Bay
A thorough visual inspection is the first step in diagnosing engine problems. This involves carefully examining all visible components for any signs of damage, leaks, or loose connections. Look for anything out of the ordinary, such as cracked hoses, frayed wires, or unusual deposits on engine parts. Pay close attention to areas known for leaks, such as the oil pan, valve cover gasket, and coolant hoses.
Note the location and extent of any damage or abnormalities observed. Document your findings with photos or detailed notes. This initial visual assessment often provides crucial clues about the potential cause of the engine trouble.
Engine Oil Level, Condition, and Type
Checking the engine oil is crucial for maintaining engine health. Begin by locating the oil dipstick, usually marked with a yellow handle. Remove the dipstick, wipe it clean with a rag, reinsert it fully, and remove it again. The oil level should fall between the minimum and maximum marks on the dipstick. Low oil levels indicate a leak or consumption problem.
Inspect the oil’s condition. Fresh oil is typically amber-colored and relatively clear. Dark, sludgy oil suggests it needs changing. Finally, verify the oil type matches the manufacturer’s recommendations specified in your owner’s manual. Using the wrong oil type can damage your engine.
Coolant Level and Condition, How to troubleshoot Mitsubishi Eclipse Cross engine problems
Checking the coolant level is equally important. Locate the coolant reservoir tank, usually a translucent plastic container. The coolant level should be within the marked minimum and maximum lines when the engine is cold. Low coolant levels could indicate a leak in the radiator, hoses, or water pump. Inspect the coolant’s condition.
Healthy coolant is typically a vibrant green or orange (depending on the type used) and relatively clear. Cloudy, rusty, or milky coolant may indicate contamination or a head gasket leak.
Using an OBD-II Scanner to Retrieve Diagnostic Trouble Codes (DTCs)
An OBD-II scanner is a valuable tool for diagnosing engine problems. This device plugs into the vehicle’s OBD-II port, usually located under the dashboard. Once connected, the scanner retrieves diagnostic trouble codes (DTCs), which are numerical codes that indicate specific problems within the engine’s electronic control system. Each DTC corresponds to a specific fault. Consulting a DTC lookup chart or repair manual will help interpret the codes and identify potential causes of the engine trouble.
This provides a more precise diagnosis compared to visual inspection alone.
Diagnostic Flowchart
The following flowchart illustrates a systematic approach to diagnosing engine problems:
                                    Start
                                      |
                      ----------------------------------------
                      |                                      |
              Initial Engine Symptoms (e.g., rough idle, loss of power)  |
                      |                                      |
                      ----------------------------------------
                                      |
                                      V
                    Visual Inspection of Engine Bay
                                      |
                      ----------------------------------------
                      |                                      |
                Problem Found (e.g., leak, loose connection)  |    No Problem Found
                      |                                      |    ----------> Check Oil Level, Condition, and Type
                      V                                      |
              Repair/Replace Damaged Component                |
                                      |
                      ----------------------------------------
                      |                                      |
                    Problem Solved?
 Yes --> End              |   No Problem Found
                      |                                      |    ----------> Check Coolant Level and Condition
                      V                                      |
                Problem Solved?
 Yes --> End              |   No Problem Found
                                      |    ----------> Use OBD-II Scanner
                                      V
                                    DTC Retrieved
                                      |
                      ----------------------------------------
                      |                                      |
                Consult DTC Lookup Chart/Repair Manual      |   No DTC Found
                      |                                      |   ----------> Further Diagnostic Testing Needed
                      V                                      |
                Repair Based on DTC                          |
                                      |
                      ----------------------------------------
                                      V
                                Problem Solved?
Yes --> End
                                      |
                                      V
                                  No --> Further Investigation
Addressing Specific Engine Issues
Troubleshooting engine problems in your Mitsubishi Eclipse Cross can seem daunting, but a systematic approach can lead to a quick resolution.
Understanding the specific symptoms and potential causes is crucial for effective diagnosis and repair. This section will delve into common engine issues, providing practical troubleshooting steps.
Misfire Troubleshooting
A misfire in your Eclipse Cross engine is characterized by rough idling, loss of power, and potentially a check engine light illuminating. This indicates that one or more cylinders aren’t firing properly. The first step involves checking the spark plugs for wear, damage, or fouling. Visually inspect each plug for carbon buildup, cracks, or electrode wear. If necessary, replace them with new, correctly specified spark plugs.
Next, inspect the ignition coils for cracks or damage. A faulty coil can prevent a spark from reaching the spark plug. Testing the ignition coils with a multimeter might be necessary to confirm their functionality. Furthermore, examine the fuel injectors for clogs or leaks. A clogged injector will restrict fuel flow to the cylinder, resulting in a misfire.
A fuel pressure test can confirm adequate fuel delivery. Finally, check the mass airflow sensor (MAF) for proper operation. A faulty MAF sensor can provide incorrect readings to the engine control unit (ECU), leading to misfires. If the problem persists after these checks, a professional diagnostic scan might be necessary to pinpoint the exact cause.
Excessive Engine Oil Consumption
Excessive oil consumption can signify a number of problems within your Eclipse Cross engine. One common cause is worn piston rings, allowing oil to seep into the combustion chamber and burn off. This often manifests as bluish exhaust smoke. Another potential cause is a damaged valve stem seal, which prevents oil from leaking past the valve stems. This can also lead to excessive oil consumption.
Troubleshooting a Mitsubishi Eclipse Cross engine issue can be tricky, requiring a keen eye for detail and diagnostic skills. If you’re struggling to pinpoint the problem, finding the right mechanic is crucial; check out this list of Best mechanic shops specializing in Mitsubishi repair to get expert help. Once you’ve identified a reputable shop, you’ll be well on your way to getting your Eclipse Cross back on the road smoothly.
A leaky head gasket can also introduce oil into the cooling system or vice versa, causing a milky substance in the oil or coolant. A thorough visual inspection of the engine for any visible oil leaks is the first step. If leaks are found, repairing or replacing the faulty components is necessary. A compression test can help determine the condition of the piston rings.
A leak-down test can help identify problems with valve seals or head gaskets. Addressing the root cause of the oil leak is crucial to prevent further engine damage.
Engine Overheating Diagnosis and Repair
An overheating engine is a serious issue that can lead to catastrophic engine failure. Symptoms include the temperature gauge rising above the normal operating range, steam or smoke emanating from the engine bay, and the overheating warning light illuminating. The first step is to safely pull over and turn off the engine to prevent further damage. Never attempt to open the radiator cap while the engine is hot, as this can result in severe burns.
Check the coolant level in the overflow reservoir. Low coolant levels indicate a leak in the system. Inspect the radiator hoses for cracks or bulges. A damaged hose will cause a coolant leak. Check the radiator itself for leaks or damage.
A damaged radiator will need to be repaired or replaced. If the coolant level is normal, the problem might lie within the cooling system’s components, such as a malfunctioning water pump, a clogged radiator, or a faulty thermostat. A professional mechanic can perform a pressure test on the cooling system to detect leaks or other problems. Replacing faulty components and bleeding the cooling system are essential steps in resolving the issue.
Cooling System Issues
The cooling system is crucial for maintaining the optimal operating temperature of your Eclipse Cross engine. Problems within this system can lead to overheating. This includes issues with the radiator, water pump, thermostat, coolant hoses, and the radiator cap. Regularly inspect these components for leaks, cracks, or damage. The radiator should be flushed and cleaned periodically to remove accumulated debris that can restrict coolant flow.
The thermostat should open and close correctly to regulate coolant flow. A faulty thermostat can cause either overheating or poor engine warming. The water pump ensures proper circulation of coolant. A failing water pump can result in insufficient cooling and overheating. A pressure test can help diagnose leaks within the cooling system.
Troubleshooting Mitsubishi Eclipse Cross engine issues can be tricky, requiring careful diagnosis. Before diving into complex repairs, however, consider the overall condition of your vehicle; if major engine work seems inevitable, you might want to explore other options. Check out this list of Best used Mitsubishi SUVs under $15000 to see if a newer, more reliable option fits your budget.
Returning to the Eclipse Cross, remember to always consult your owner’s manual for basic troubleshooting steps before seeking professional help.
Repair or replacement of any damaged components is necessary to restore proper cooling system function.
Preventative Maintenance
Regular preventative maintenance is key to avoiding major engine problems in your Mitsubishi Eclipse Cross.
- Follow the recommended oil change intervals specified in your owner’s manual.
- Inspect and replace air filter regularly to ensure proper air intake.
- Check and top off coolant levels as needed, and flush the cooling system periodically.
- Inspect and replace spark plugs according to the manufacturer’s recommendations.
- Regularly inspect the serpentine belt for wear and tear.
- Schedule routine inspections by a qualified mechanic for early detection of potential issues.
Engine Performance Issues and Solutions

Maintaining peak performance in your Mitsubishi Eclipse Cross requires understanding and addressing potential engine issues promptly. Ignoring minor problems can lead to more significant, costly repairs down the line. This section focuses on common performance problems, their causes, and practical solutions.
Low engine power and poor fuel economy, while distinct, often share underlying causes. Low engine power manifests as sluggish acceleration and difficulty reaching higher speeds, while poor fuel economy is characterized by significantly reduced miles per gallon. Both can stem from issues like clogged air filters, failing fuel injectors, or a malfunctioning mass airflow sensor (MAF). However, low engine power might also indicate more serious problems like a failing catalytic converter or a leak in the intake manifold, whereas poor fuel economy could be related to driving habits or tire pressure.
Rough Idling and Stalling Causes
Rough idling, characterized by engine vibrations and an unsteady RPM, and stalling, where the engine unexpectedly shuts off, are frustrating issues. These problems can originate from several sources, including faulty spark plugs or ignition coils, a dirty or damaged throttle body, vacuum leaks in the intake system, low fuel pressure, or issues with the engine control module (ECM). A failing crankshaft position sensor (CKP) can also contribute to these symptoms.
Addressing these issues requires systematic diagnostics to pinpoint the root cause.
Spark Plug Inspection and Replacement
Regular spark plug maintenance is crucial for optimal engine performance. A step-by-step guide for checking and replacing them involves:
- Disconnect the negative battery terminal to prevent electrical shock.
- Locate the spark plugs, usually under a plastic cover near the engine’s top.
- Use a spark plug socket wrench to carefully remove each plug, noting its position for correct reinstallation.
- Inspect the removed plugs for signs of wear, such as excessive fouling, electrode erosion, or cracks. A worn or damaged plug will likely have a grayish, black, or oily appearance.
- If necessary, replace the plugs with new ones of the correct type and gap (specified in your owner’s manual).
- Carefully install the new plugs, tightening them to the manufacturer’s recommended torque specification. Over-tightening can damage the engine block.
- Reconnect the negative battery terminal.
- Start the engine and check for smooth idling and improved performance.
Throttle Body Inspection and Cleaning
The throttle body, responsible for regulating airflow into the engine, can become clogged with carbon deposits over time, leading to poor engine performance. Cleaning the throttle body involves:
- Disconnect the negative battery terminal.
- Locate the throttle body, usually on the intake manifold.
- Remove the throttle body’s air intake hose and any other components obstructing access.
- Use a throttle body cleaner and a clean rag or brush to carefully remove carbon deposits from the throttle plate and the surrounding areas.
- Reconnect all components and the battery terminal.
- Start the engine and check for improved idling and responsiveness.
Engine Oil Types and Suitability
Choosing the correct engine oil is critical for engine longevity and performance. Different oils offer varying levels of protection and performance characteristics. The following table compares common types:
| Oil Type | Viscosity Grade (Example) | Performance Level (Example) | Suitability for Mitsubishi Eclipse Cross |
|---|---|---|---|
| Conventional | 5W-30 | API SN | Suitable for older vehicles or less demanding driving conditions. Check your owner’s manual for specific recommendations. |
| Synthetic Blend | 5W-30 | API SN Plus | Offers a balance of performance and affordability, often recommended for moderate driving conditions. |
| Full Synthetic | 0W-20 | ILSAC GF-6A | Provides superior protection and performance, especially beneficial in extreme temperatures or high-performance driving. Check your owner’s manual for specific recommendations. |
| High-Mileage Synthetic | 5W-30 | API SN Plus | Formulated to address the specific needs of higher-mileage engines, including better seal protection. Check your owner’s manual for specific recommendations. |
Advanced Troubleshooting Techniques
When basic troubleshooting steps fail to pinpoint the source of your Mitsubishi Eclipse Cross engine problems, it’s time to delve into more advanced diagnostic techniques. These methods require specialized tools and a deeper understanding of automotive mechanics, but they can be crucial in resolving complex engine issues. This section will guide you through several advanced procedures, empowering you to diagnose and fix even the most stubborn engine problems.Professional-Grade Scan Tool UsageA professional-grade scan tool provides far more detailed information than a basic OBD-II reader.
These tools can access live data streams from various engine sensors, allowing you to monitor parameters like fuel pressure, air/fuel ratio, and ignition timing in real-time. This real-time data is invaluable in identifying intermittent problems that might not be readily apparent through other diagnostic methods. For example, a scan tool can detect subtle variations in sensor readings that indicate a failing oxygen sensor or a problem with the fuel injectors.
By observing these live data streams under different driving conditions, you can isolate the source of the problem much more effectively. Furthermore, many professional scan tools allow you to perform various actuator tests, directly commanding components like fuel injectors or solenoids to verify their proper function.
Compression Test Procedure
A compression test measures the pressure inside each cylinder when the engine is cranked. Low compression in one or more cylinders indicates a problem with the valves, piston rings, or head gasket. The procedure involves removing the spark plugs, installing a compression gauge into each cylinder, and cranking the engine. The gauge will display the compression pressure in each cylinder.
Ideally, all cylinders should have similar compression readings within a specified range, usually detailed in your vehicle’s repair manual. Significant differences between cylinders point to a specific cylinder problem. For example, consistently low compression in one cylinder could suggest a burnt valve, while low compression across multiple cylinders might indicate a head gasket failure. A leak-down test, a related procedure, can further pinpoint the source of low compression by introducing compressed air into the cylinder and listening for escaping air.
Vacuum Leak Detection
Vacuum leaks can significantly impact engine performance, leading to rough idling, poor fuel economy, and even misfires. Detecting these leaks requires a systematic approach. One common method involves using a vacuum gauge connected to a manifold vacuum port. A steadily dropping vacuum reading while the engine is idling indicates a leak somewhere in the intake system. You can then use a smoke machine to visually identify the leak.
The smoke will be drawn into the intake system through the leak, making its location readily apparent. Common sources of vacuum leaks include cracked intake hoses, loose clamps, and faulty gaskets. Another approach involves listening for hissing sounds around the intake manifold and vacuum lines while the engine is running.
Interpreting Engine Control Unit (ECU) Sensor Data
The ECU constantly monitors various engine sensors and uses this data to control fuel delivery, ignition timing, and other critical engine functions. Analyzing this data can provide valuable insights into engine problems. A professional-grade scan tool is essential for accessing and interpreting this data. Understanding the normal operating ranges of each sensor is crucial. For instance, a consistently high or low oxygen sensor reading might indicate a problem with the sensor itself or a fault in the fuel system.
Similarly, erratic readings from a mass airflow sensor can point to a faulty sensor or a problem with the air intake system. By carefully reviewing the sensor data and comparing it to the manufacturer’s specifications, you can pinpoint the cause of many engine problems.
Additional Resources
Accessing reliable information is key to successful troubleshooting. Here are some valuable resources:
- Factory Repair Manuals: These manuals provide detailed information about your specific vehicle’s engine system, including diagnostic procedures and specifications.
- Online Forums: Websites and forums dedicated to Mitsubishi Eclipse Cross owners can be a great source of information and advice. You can often find discussions of similar problems and solutions from other owners.
- Independent Repair Shops: Consult experienced mechanics at independent repair shops for expert advice and diagnosis. They possess the tools and knowledge to handle complex engine problems.
Illustrative Examples of Engine Problems and Repairs: How To Troubleshoot Mitsubishi Eclipse Cross Engine Problems
Understanding the complexities of engine issues requires examining real-world scenarios. This section details two case studies, highlighting the diagnostic process and repair solutions for common Mitsubishi Eclipse Cross engine problems. These examples showcase the practical application of the troubleshooting techniques discussed previously.
Case Study 1: Malfunctioning Mass Airflow Sensor
This case involves a 2019 Mitsubishi Eclipse Cross experiencing rough idling, hesitation during acceleration, and a noticeable decrease in fuel economy. The owner reported a check engine light illuminated, accompanied by a persistent engine sputtering sound. Diagnostic testing revealed a fault code indicating a malfunctioning Mass Airflow Sensor (MAF). The MAF sensor measures the amount of air entering the engine, crucial for precise fuel injection.
A faulty sensor provides inaccurate readings, leading to an imbalanced air-fuel mixture.The repair involved replacing the MAF sensor. This is a relatively straightforward procedure, requiring the removal of the sensor housing, unplugging the sensor connector, and installing the new sensor. The new sensor was carefully secured, ensuring a proper seal. After the replacement, the fault code was cleared, and a test drive confirmed the resolution of the issues.
The vehicle’s performance returned to normal, with smooth idling, responsive acceleration, and improved fuel economy.
Illustrative Image Description: The image would show a comparison between a damaged MAF sensor and a new one. The damaged sensor might display visible signs of wear, such as a dirty or corroded sensing element, potentially with visible cracks or damage to the wiring harness. The new sensor would appear clean, with intact wiring and a shiny, undamaged sensing element, highlighting the clear contrast between a functional and malfunctioning component.
Case Study 2: Faulty Spark Plug
A 2021 Mitsubishi Eclipse Cross presented with intermittent misfires, accompanied by a rough running engine, particularly noticeable under load. The owner also reported a loss of power and a slight decrease in fuel efficiency. Diagnostic scans identified a misfire in cylinder number 3. Further investigation focused on the spark plug in that cylinder, a common cause of misfires.
Inspection revealed a spark plug with excessive wear and carbon buildup, hindering its ability to generate a strong, consistent spark.The repair involved replacing the faulty spark plug in cylinder number 3. This required removing the spark plug wire, carefully extracting the old spark plug using a spark plug socket, and installing a new, correctly gapped spark plug. The new spark plug was torqued to the manufacturer’s specified tightening value, preventing damage to the cylinder head.
After the repair, the misfire code was cleared, and the engine ran smoothly. The loss of power and decreased fuel efficiency were also resolved.
Illustrative Image Description: The image would showcase a correctly functioning spark plug, clean and exhibiting a uniform gap between the electrodes. It would highlight the clean, metallic surface of the electrode and the overall pristine condition of the plug. The image might include a close-up view of the spark plug’s components, such as the insulator and the central electrode, emphasizing their integrity and proper functioning.
The image would contrast sharply with a potentially damaged spark plug, which would display a visibly dirty or corroded electrode, and a damaged or irregular gap.

